


A seed and grain mosaic

 About this lesson
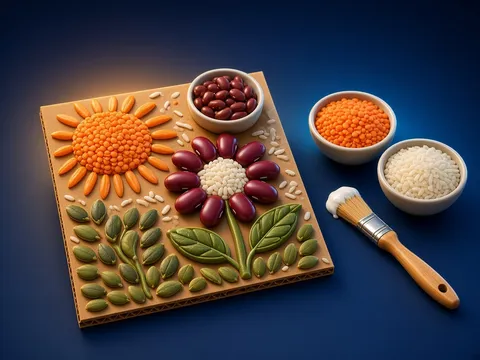
A mosaic is a picture made of many small pieces. The kitchen has plenty of coloured materials: red beans, orange lentils, white rice, green pumpkin seeds, black peppercorns. First draw a simple picture on card, then fill it one area at a time: spread glue on one area, lay the seeds closely, then move to the next. Work from the outline inwards. Let the finished panel dry lying flat.
 What the book shows

In technology lessons the child works with their hands: cutting, folding, gluing and making things from natural materials. Every task starts with a safety rule.
Textbook link:
This is not the textbook’s text but a short description of the topic. Check the exact page in your own textbook.
 The lesson step by step
- 1
Warm-up5 min
Grain palette.
- 2
New topic10 min
What is a mosaic?
- 3
Practice10 min
Sketch and plan.
- 4
Game10 min
Gluing area by area.
- 5
Wrap-up5 min
Gallery.
 Let’s understand
For the student Simple language
| Material | Colour | Use it for |
|---|---|---|
| 🫘 beans | red-brown | big petals |
| 🟠 lentils | orange | a sun, fruit |
| 🍚 rice | white | clouds, a flower centre |
| 🌱 pumpkin seeds | green | leaves, grass |
 For the parent
How to help
- Gather a colourful “palette” of grains in the kitchen.
- Sprout a bean on damp cotton wool and watch it grow.
 For the teacher
 Lesson goals
- Choose seeds and grains by colour, size and shape and make a mosaic panel on card.
How to teach it
- Demonstration, step-by-step making, pair work, a display
 Differentiation
- Weaker pupils work from a ready outline; stronger pupils make their own design
 Questions for the class
- How do we make a seed mosaic?
 How to check
The pupil chooses materials by colour and makes a neat, tightly packed mosaic.
 Scientific Scientific language
A seed is alive
Inside is a tiny baby plant and a store of food for it; a bean on damp cotton wool will sprout.
Why thin glue?
Small grains sink into thick glue and take ages to dry.
Self-study
Step by step
- Is my picture simple?
- Have I chosen a colour for each area?
- One area: glue, seeds, then the next.
- Dry it flat.
Going deeper
 Scientific language: for older students, parents and teachers.
Long ago mosaics were made from coloured stones and pieces of glass, and some ancient mosaics survive today.
 Play and check
Which material for this area?
 How to write it down
- Draw your mosaic plan and write which material goes in each area.
- Choose at least 3 coloured materials.
How the classwork looks in the notebook
Sample: the date and heading follow this country’s notebook rules.
 Watch out: common mistakes
 Where it helps in life
- Paper mosaic
- Figures from natural materials
 At home
Core
- Make a small 10×10 cm mosaic at home.
Extra ⭐
- Sprout a bean and draw it every day for 5 days.
How to do it
- Work with a grown-up watching.
- Tidy up afterwards.
Answers for parents
Sprouting: first the bean swells, then the skin splits, a little root appears and later a green shoot. The number of days depends on warmth.
Step-by-step homework solution — Show the solution (try it yourself first)
Plan
- A flower: rice for the centre, beans for petals, pumpkin seeds for the stem and leaves, lentils for the background.
How the homework looks in the notebook
Sample: the date and heading follow this country’s notebook rules.

 About cookies